Showing posts with label repurposing. Show all posts

Wednesday, May 27, 2009

Hot Peppers

Last year, my pepper crop was a dismal failure. I think I got only one measly pepper from the few plants that actually germinated, so this year I decided to add a little something to my scheme and see how the plants reacted. Unfortunately, our gardening budget for this year has been maxed out. I had to think of something for less than cheap... something free.


My version of the cloche: repurposed baby food jars. Don't mind the wonky spacing. In real life, they are actually evenly spaced, but the camera was at a weird angle.


I was hoping that my improvised cloches would provide enough heat retention that I 'd get a higher germination rate and faster growth of pepper plants than I did last year with no added protection. So far, the germination has been quicker but not higher. I'm leaving the jars over top of the seedlings until they outgrow them. We'll see how it goes.

Tuesday, January 20, 2009

Frugal Babywearing: How to Carry a Baby in a Bed Sheet


(Video from Magic City Slingers Blog)

Babywearing may be all the rage now, but it's hardly new and really, truly does not have to be expensive. A simple bedsheet will do in a pinch, as the video above shows you. It'll take some practice, but nothing more than the Moby Wrap or the Ultimate Baby-Wrap Carrier requires.

The "carrier" featured in the video does not require any sewing, but if you'd like to get a little more tailored with your bedsheet:

Sling Article and How-To
Karma Baby's Sling Pattern

And if you've already got mini-mamas at home, like me:

A DIY Child's Pouch Sling @ Chasing Cheerios

Oh how I'm looking forward to the days of having a baby snuggled against my chest... *sigh*

Wednesday, November 19, 2008

Homemade Gift (Kinda Sorta)


Annie absolutely cannot stop drawing and crafting. She wants to do it all day long, every day, and she brings at least 5 drawings or projects home each day from school. For her birthday, then, I decided that she might appreciate her very own art box. This way she doesn't have to ask me to get the crayons for her (which are put up because a certain 2-year-old has covered every single downstairs wall with doodles), and I got to introduce some new craft items to her that have been stored in my cache.

In total, this gift cost about $20 because there were a few items that we don't generally keep on hand in the house that I wanted to add especially for her. The box itself is actually my old Caboodle that I kept my makeup and accessories in as a teen. In the box we have:

  • 3 craft punches (dog, cat, and paw print for my little animal lover)-- From my scrapbooking stash

  • Mini stapler-- Bought new for use in making her own booklets

  • Large eraser-- Gathered from the kids' art supplies

  • Pencil sharpener-- Gathered from the kids' art supplies

  • Two pencils-- Gathered from the kids' art supplies

  • Glue stick-- Gathered from the kids' art supplies

  • Safety scissors-- Bought new since we only had one pair in the house

  • Heart shaped paperclips-- Bought new (and grudgingly)

  • 8 Glitter glue pens-- Bought new; the most expensive new item, but I knew she'd love them!

  • Crayons-- Gathered from the kids' art supplies

  • White sketching paper-- I looked all over for a mini sketchbook that would fit, but couldn't find one. Instead, I cut up some larger sheets we already had at home.

  • Construction paper-- Again, small sheets cut from larger sheets we already had

  • Pipe cleaners-- Gathered from the kids' art supplies

  • Beads-- Bought new

  • Elastic thread for beading-- Bought new

  • Cinderella stamp and pad of stamping paper-- Received in a party gift bag earlier in the year


  • Phew! I think that's it. As her skills improve, we'll add things gradually. For now, this keeps her plenty occupied. She makes magic wands from the pipe cleaners, bracelets and necklaces from the beads and elastic thread, and has covered every sheet of paper in glittery doodles. Fun stuff!

    Sunday, July 6, 2008

    Creating Sewing Space

    When the twins were born, it wasn't long before I bought a sewing machine. I hadn't really done much sewing, but I took a class in high school (my only home ec course EVER) and remembered fondly the feeling of sitting in front of the humming machine, fabric running through my fingers. That first year, I made Samhain/Halloween costumes for the kids, but it was stressful to try and sew with two 11-month-olds running around in the apartment where I couldn't really have my own space. Fast forward nearly 4 years later, and the sewing machine has only been used a handful of times. They reason for that is really pretty simple. This is my current sewing space:


    That pretty and inspiring cardboard box is in an equally beautiful and inspiring space, my attic. Not fun to sew in. Couple that with the lack of childproof space downstairs, and that means each and every time I need to sew something, I have to climb to the attic, haul down the box, unload everything on my dining room table, do what I can in the time alotted, pack it back up, lug the box back up to the attic... You get the picture. That means that I have piles of mending all over the house that never get done because I'm just too lazy to haul out the supplies, we've gone stocking-less every Yule since the twins were born, and Samhain costumes were put off last year because I didn't want the stress of dealing with a 1-year-old around an electric sewing machine. These things need to start getting done. So, since I'm currently and slowly trying to declutter the attic, I knew it was time to claim some space for myself.

    But where?
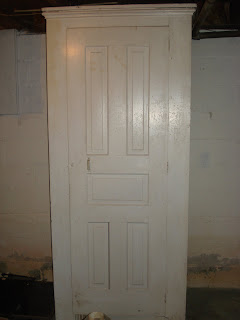

    Enter this cabinet. It currently resides in my basement, holding old paint and various other articles left here by the previous owner of our home. I have no idea how I'm going to get this huge, hulking thing up the narrow basement steps or where I'm going to put it when I do, but the plan is to turn this into something a little more like this.

    So now's the time to assess just what it is I need in a sewing space. First and foremost, I need space for my machine. All the shelves in the cabinet are fixed, so I think it'd be best to remove one and add a few sliding brackets to it rather than go nuts trying to turn fabric in such a tight space. I also need room for fabric, patterns, notions, thread, etc. I'm not a fabric hoarder (yet), usually just buying what I need to complete my planned project, so one shelf should do for now. I can use baskets, jars, or other containers I have around the house for the notions and patterns, but I really like the little thread rack in Martha's sewing closet. I'll have to see about making one of those for myself. The magnetic bobbin holder is pretty sweet too. I'm not really big on memo boards because, honestly, I'm just not all that creative. I tend to follow set patterns and work from instructions. That leaves the door space open, and I think I'll try mounting some hardware up there to get rid of another bit of clutter in the attic, my scrapbooking and cardmaking supplies. Anyone out there have other ideas for efficient, organized sewing space? Where do you sew? I'm thinking it might be the dining room for me, maybe even the kitchen...

    Friday, June 20, 2008

    The "Creative" Gardener


    Okay, maybe unprepared, unschooled, and cheap would be better descriptors for this post, but hey...

    What the heck is so creative about the picture here? Well, no one told me not to plant Scarlet Runner Beans as one of the components of my Three Sisters garden (actually, a Two Sisters garden because I knew the pumpkins/squash just wouldn't have enough room to sprawl in this small bed... another mistake that will soon be remedied). They are shooting up much faster than the sweet corn I planted (Golden Bantam) and have nothing to cling to. The situation has been exacerbated by our adorable *coughcough* squirrel population who deprived us of several corn plants by getting beneath the green plastic "chicken wire" I'd used to keep the crows out. I had actually saved several very long, straight limbs from the redbud tree that was felled last summer by a lightning storm to use as a bean teepee, but when I changed my garden plans (a weekly occurence) and decided to go the Three Sisters route, I turned the teepee into mulch. What's a girl to do!?

    Use the umbrella that goes to the kids' sand and water table of course! :D They never use the umbrella anyway because it's on the side of the yard that's too shady for me to garden in... hehe

    Thursday, June 5, 2008

    Making Do

    Today's been a busy day.

    The biggest project was getting 5 things I'd sold on eBay during my ongoing decluttering quest packaged and shipped. I'm a cheapskate and HATE spending money on boxes at the post office, so I tend to use whatever I have at hand. I'd been wrapping stuff in some Kraft paper that was used as filler in a package I'd received, but there was only enough left for one item. Soooooo... I was stuck. I sifted through boxes in the attic and basement, looking for those that weren't massive moving type boxes, but there was really nothing useable. Then I spotted it! A paper Gymboree bag passed onto me from my mother-in-law to haul the mountain of kids' gifts home at Christmas. It was housing plastic hangers from said Christmas gifts to be recycled. The outside was striped in bold colors, but the inside was just plain brown, and the paper was actually thicker than the Kraft paper I'd been using.

    I carefully opened the seams of the bag until I had a flat piece of paper, then wrapped up the items I was sending with the brown inside of the bag on the outside of the packages. Ahhhhh... cheapskate--er--FRUGAL packaging. :)